Apache Airflow is an open-source platform to programmatically author schedule and monitor workflows, 'any' workflows! period!
With Airflow you can now programmatically author, schedule and monitor workflows. What it solves is brilliant because you could keep Python as a common language and all your scikit learn imports to pandas and numpy and even your database drivers could be fit into the workflow without having to worry about multi-platform integrations, and that is a very big thing! No Zookeeper, no Java, no Scala! keeping it really simple!
Airflow is not a data streaming solution. Tasks do not move data from one to the other (though tasks can exchange metadata!). Airflow is not in the Spark Streaming or Storm space, it is more comparable to Oozie or Azkaban.
As per Airflow documentation Airflow is built on the following Principles:
Dynamic: Airflow pipelines are configuration as code (Python), allowing for dynamic pipeline generation. This allows for writing code that instantiates pipelines dynamically.
Extensible: Easily define your own operators, executors and extend the library so that it fits the level of abstraction that suits your environment.
Elegant: Airflow pipelines are lean and explicit. Parameterizing your scripts is built into the core of Airflow using the powerful Jinja templating engine (Its exploited better than it was in Django and thats pure magnificence).
Scalable: Airflow has a modular architecture and uses a message queue to orchestrate an arbitrary number of workers. Airflow is ready to scale to infinity.
Install AirFlow
The installation is quick and straightforward, however do the following first if you are on a Linux debian distribution
sudo apt-get update
sudo apt-get install build-essential
and then go on to run this, (update the username and pwd as per what you like to choose)
export AIRFLOW_HOME=~/airflow
pip install apache-airflow
db init airflow users create \
airflow webserver
airflow scheduler
Then run
airflow tasks run example_bash_operator runme_0 2021-01-01
airflow dags backfill example_bash_operator \
--start-date 2021-01-01 \
--end-date 2021-01-02
Core Concepts of AirFlow 2.0.0
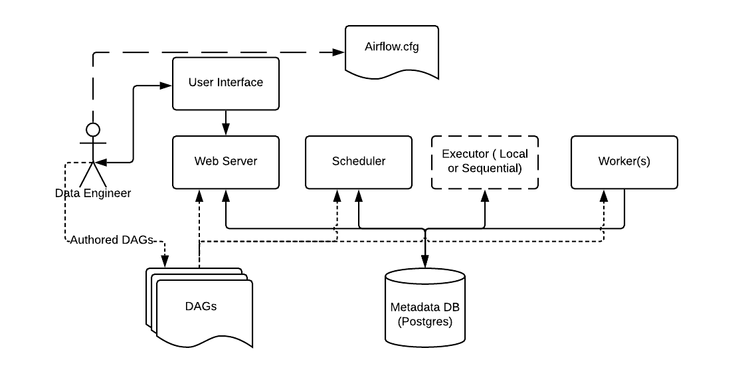
Lets now look at the core concepts of Airflow, but the architecture first which sort of simplifies it all. Note that Airflow on its own does not move data. You're the data engineer and you got to work with a database to do that, say Apache Spark for example.
Now some important Concepts
Metadata Database: Airflow uses a SQL database to store metadata about the data pipelines being run. In the diagram above, this is represented as Postgres which is extremely popular with Airflow. Alternate databases supported with Airflow include MySQL.
Web Server and Scheduler: The Airflow web server and Scheduler are separate processes run (in this case) on the local machine and interact with the database mentioned above.
The Executor is shown separately above, since it is commonly discussed within Airflow and in the documentation, but in reality it is NOT a separate process, but run within the Scheduler.
The Worker(s) are separate processes which also interact with the other components of the Airflow architecture and the metadata repository.
airflow.cfg is the Airflow configuration file which is accessed by the Web Server, Scheduler, and Workers.
DAGs refers to the DAG files containing Python code, representing the data pipelines to be run by Airflow. The location of these files is specified in the Airflow configuration file, but they need to be accessible by the Web Server, Scheduler, and Workers.
Its all about DAGs, lets look at what it is
Airflow DAG
Workflows are defined in Airflow by DAGs (Directed Acyclic Graphs) and are nothing more than a python file. A single DAG file may contain multiple DAG definitions, although it is recommended to keep one DAG per file.
Let’s take a look at example DAG:
from airflow.models import DAG from airflow.utils.dates
import days_ago
with DAG("etl_sales_daily",
start_date=days_ago(1),
schedule_interval=None,)
as dag:
First of all, DAG is identified by unique dag_id which has to be unique in whole Airflow deployment. Additionally, to create a DAG we need to specify:
schedule_interval—which defines when the DAG should be run. It can be timedelta object for example timedelta(days=2) or a string cron expression *. It can be None and then the DAG will not be scheduled by Airflow but it can still be triggered manually or externally.
start_date - a date (datetime object) from which the DAG will start running. This helps run a DAG for past dates. It is common to use the days_ago function to specify this value. If the date is in the future you can still trigger the dag manually.
Once we have this baseline, we can start adding tasks to our DAG:
from airflow.models import DAG from airflow.utils.dates import days_ago from airflow.operators.dummy_operator import DummyOperator
with DAG("etl_sales_daily",   start_date=days_ago(1),   schedule_interval=None,) as dag:
task_a = DummyOperator(task_id="task_a")
task_b = DummyOperator(task_id="task_b")
task_c = DummyOperator(task_id="task_c")
task_d = DummyOperator(task_id="task_d")
task_a >> [task_b, task_c]
task_c >> task_d
Every task in the Airflow DAG is defined by the operator (we will dive into more details soon) and has its own task_id that has to be unique within a DAG. Each task has a set of dependencies that define its relationships to other tasks. These include:
Upstream tasks—a set of tasks that will be executed before this particular task.
Downstream tasks—set of tasks that will be executed after this task.
In our example task_b and task_c are downstream of task_a. And respectively task_a is in upstream of both task_b and task_c. A common way of specifying a relation between tasks is using the >> operator which works for tasks and collection of tasks (for example list or sets).
Will continue this on Part 2: Coming soon